Sentinel Nodes
Set Sentry Nodes
When setting up a validator, there are countless ways to configure your settings. This guide aims to showcase one of them, namely the design of Sentry Nodes. This design is mainly designed to prevent DDOS
Network layout
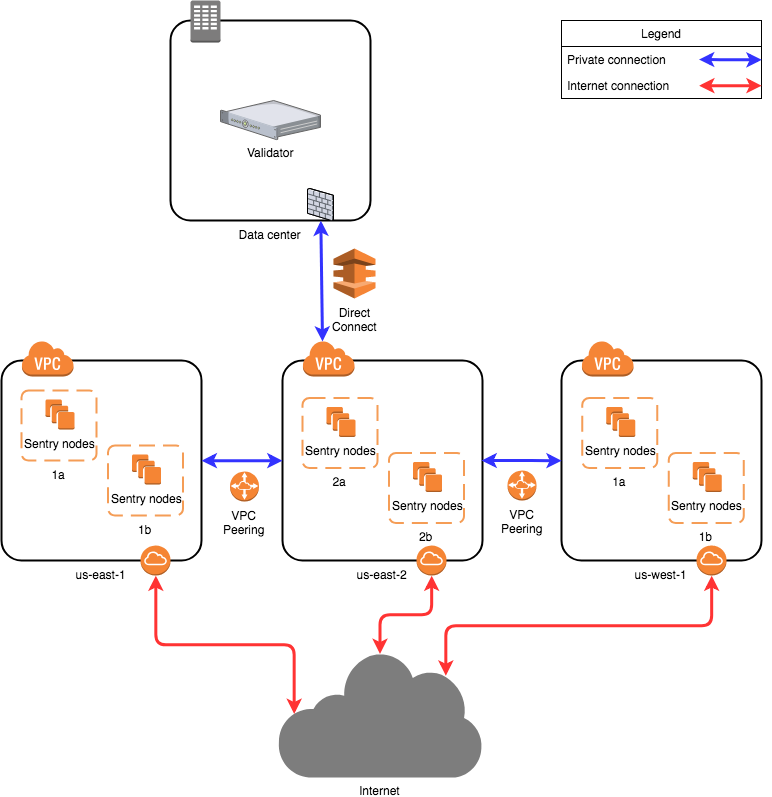
This image is based on AWS, and other cloud providers will also have similar solutions to design. Running nodes is not limited to cloud providers, but you can also run nodes on bare metal systems. Regardless of which setting you decide to adopt, the architecture will be the same.
The proposed network diagram is similar to the classic separation of backend/front-end services in enterprise environments. In this case, the 'backend' is the dedicated network of validators in the data center. The data center network may involve multiple subnets, firewalls, and redundant devices, which are not detailed in this figure. An important point is that the data center allows direct connection to the selected cloud environment. Amazon AWS has' Direct Connect ', while Google Cloud has' Partner Interconnect'. This is a dedicated connection with a cloud provider (usually directly connected to a virtual private cloud instance in a certain region).
All sentinel nodes ("front-end") are connected to the validator using this private connection. The verifier does not have a public IP address to provide the service.
Amazon has multiple available zones within a region. Sentry nodes can also be installed in other regions. In this case, the second, third, and more regions need to have private connections to the validator node. This can be achieved through VPC peer-to-peer interconnection (referred to as "VPC network peer-to-peer interconnection" in Google Cloud). In this case, the second, third, and more region sentinel nodes will be directed to the first region and connected directly to the data center to reach the validator.
A more durable solution (not detailed in the figure) is multiple direct connections from the data center to different regions. In this way, VPC peer-to-peer connection is not mandatory, but it still benefits sentinel nodes. This overcomes the risk of relying on one region. It has a higher cost.
Local configuration
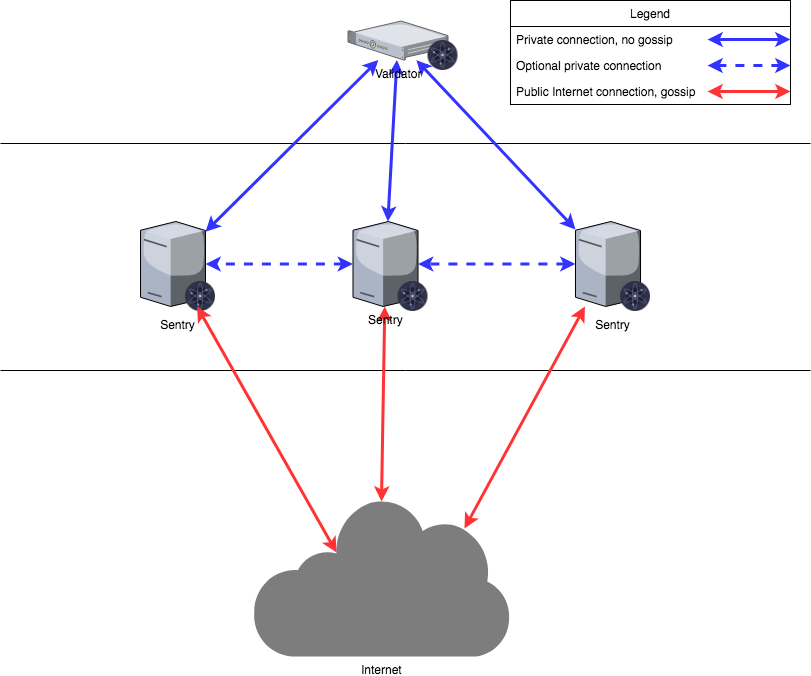
The validator will only communicate with the provided sentinel, and the sentinel node will communicate with the validator through a secret connection and communicate with the rest of the network through a normal connection. Sentry nodes can also choose to communicate with each other. When 'config. toml' initializes a node, five parameters may need to be changed.
pex:Boolean value. This will turn on or off the peer to peer network information exchange for the node. When 'pex=false', only 'persistent'_ The 'peers' list can be used to connectpersistent_peers:Comma separated` nodeID@ip A list of port values that define a list of peers expected to always be online. This is necessary during the first startup because by setting 'pex=false' nodes, they will not be able to join the networkunconditional_peer_ids:Comma separated list of node IDs. Regardless of the limitations of inbound and outbound peers, these nodes will connect to. This is very useful when sentinel nodes have a complete address book.private_peer_ids:Comma separated list of node IDs. These nodes will not be propagated to the network. This is an important field because you do not want your validator IP to be propagated to the network.addr_book_strict:Boolean value. By default, nodes with routable addresses will be considered for connection. If this setting is turned off (false), non routable IP addresses (such as those in private networks) can be added to the address book.double_sign_check_heightint64 Height. How many memory blocks should be reviewed to check the existence of node consensus voting before joining the consensus. When non zero, if the same consensus key is used to sign the last memory block of {double_sign_check_height}, the node will panic upon reboot. Therefore, the validator should stop the state machine, wait for some blocks, and then restart the state machine to avoid panic.
Verifier node configuration
| configuration option | setting |
|---|---|
| pex | false |
| persistent_peers | Sentry Node List |
| private_peer_ids | none |
| unconditional_peer_ids | Optional Sentinel Node ID |
| addr_book_strict | false |
| double_sign_check_height | 10 |
The validator node should have the characteristic of 'pex=false' so that it does not spread gossip to the entire network. The persistent peer will be your Sentinel node. Private nodes can be left blank because the validator does not attempt to hide who is communicating with. For validators, setting unconditional peers is optional as they do not have a complete address book.
Sentry Node Configuration
| configuration option | setting |
|---|---|
| pex | true |
| persistent_peers | Verifier node, optional other Sentry nodes |
| private_peer_ids | Verifier Node ID |
| unconditional_peer_ids | Verifier node, optional other Sentry nodes |
| addr_book_strict | false |
Sentry nodes should be able to communicate with the entire network, which is why 'pex=true'. The persistent peer of the Sentinel node will be the validator, and it can also be other Sentinel nodes. Sentry nodes should ensure that they do not propagate the validator's IP, so you must set the validator's nodeID as a private peer. The unconditional peer ID will be the verifier ID and optional other sentinel nodes.
Note: Do not forget to protect the firewall of the node when setting it
Obtain node nodeid
First, enter the directory where the stcd command is located, and then run the following command to obtain the NodeId
./stcd tendermint show-node-id
Nodeid is a string of length 40, for example:
b86863115efa5ded87ec36d0ad287aaee050e4d2
The default communication port of the node is 26656. If the current node IP is 8.8.8.8, the final address combination of the node should be as follows:
b86863115efa5ded87ec36d0ad287aaee050e4d2@8.8.8.8:26656
More information can be found in the following link: